> For clean Markdown of any page, append .md to the page URL.
> For a complete documentation index, see https://docs.navipartner.com/product/retail-pos-processes-pos-info-setup/llms.txt.
> For AI client integration (Claude Code, Cursor, etc.), connect to the MCP server at https://docs.navipartner.com/_mcp/server.
# POS info setup
> This article contains an overview and instructions for various configurations of POS info elements both in Business Central and on the POS units.
Some of the input suggestions serve only as an example, and can be replaced with something else, depending on the specific use case.
## Set up POS info for text per transaction
To create a POS info box in which salespeople can insert text on the POS, follow the provided steps:
1. In Business Central, click the **Search:** button, enter **POS Info List**, and choose the related link.\
A list of all existing POS info entries is displayed.
2. Click **New**.\
The **POS Info Card** is displayed.
3. Populate the necessary fields in the **General** section:
* Provide **INVTEXT** in **Code**.
* Provide **Text to Invoice** in **Description**.
* Enable **Once per Transaction**.
* Select **Request Data** in **Type**.
* Enable **Input Mandatory**.
* Select **Text** in **Input Type**.
## Insert text to invoice on the POS
### Prerequisite
* Make sure the **Set up POS info for text per transaction** procedure has been completed.
### Procedure
1. Open the POS.
2. Scan the items, and press the previously created **Text to Invoice** POS info button.\
A pop-up window is displayed, prompting you to input the POS info.
3. Provide the text you wish to be included in the invoice.
4. Complete the sale by finalizing the payment.
5. To view the message provided on the POS in Business Central, open it, then navigate to the **POS Entry List** administrative section.
6. Hover over the transaction line, and click the **POS Info POS Entry** action in the ribbon.\
A page containing the details of the POS info entry are displayed, along with the text-to invoice description you've provided.
## Set up POS info for text in POS sale lines
To create a POS info box in which salespeople can scan or type text (e.g. serial number), follow the provided steps:
1. In Business Central, click the **Search:** button, enter **POS Info List**, and choose the related link.
2. Click **New**.\
The **POS Info Card** is displayed.
3. Populate all necessary fields in the **General** section:
* Provide **SERIALNO** in **Code**.
* Provide **Scan Serial No.** in **Description**.
* Enable **Available in Front-End**.
* Select **Request Data** in **Type**.
* Select **Text** in **Input Type**.
## Add text to the POS transaction
### Prerequisite
* Make sure the **Set up POS info for text in POS sale lines** procedure has been completed.
### Procedure
1. Open the **POS**.
2. Scan the items, and press the previously created **Scan Serial No.** POS info button.\
A pop-up window in which you can scan/insert the serial number is displayed.
3. Provide the serial number manually or via scanner.\
The POS info is assigned to each line.
4. Complete the sale by finalizing the payment.
5. To view the message provided on the POS in Business Central, open it, then navigate to the **POS Entry List** administrative section.
6. Hover over the transaction line, and click the **POS Info POS Entry** action in the ribbon.\
A page containing the details of the POS info entry are displayed, along with the serial number.
## Display a message when using a customer on the POS
To create a POS info box in which salespeople can receive messages on the POS, follow the provided steps:
1. In Business Central, click the **Search:** button, enter **POS Info List**, and choose the related link.
2. Click **New**.\
The **POS Info Card** is displayed.
3. Populate all the necessary information in the **General** section:
* Provide **MESS** in **Code**.
* Provide **Message on Using Customer** in **Description**.
* Provide **Bad Payer - Ask for Settlement of O/S Invoices** in the **Message**.\
In general, the message content should indicate to the salesperson what kind of steps need to be taken next in regards to the selected customer.
* Select **Show Message** in **Type**.
### Use data from a Business Central table as POS info for the transaction
To create a POS info box in which a salesperson can choose between various options, follow the provided steps:
1. In Business Central, click the **Search:** button, enter **POS Info List**, and choose the related link.
2. Click **New**.\
The **POS Info Card** window is displayed.
3. Populate all the necessary fields in the **General** section.
* Provide **PC CODE** in **Code**.
* Provide **Post Code List** in **Description**.
* Enable **Once per Transaction**.
* Select **Request Data** in **Type**.
* Enable **Input Mandatory**.
* Select **Table** in **Input Type**.
* Select **225** in **Table No.**.
## Insert text to the transaction on the POS
### Prerequisite
* Make sure the **Use data from a Business Central table as POS info for the transaction** procedure has been completed.
### Procedure
1. Open the POS.
2. Press the previously created **POS Info** button.
3. Choose the POS info value from the **POS Info Lookup**.
4. Complete the sale by finalizing the payment.
5. To view the message provided on the POS in Business Central, navigate to the **POS Entry List** administrative section.
6. Hover over the transaction line, and click the **POS Info POS Entry** action in the ribbon.\
A page containing the POS info details is displayed.
## Use data from the POS info sub-table for the transaction
If you wish to establish this kind of setup, you need to use all possible options in POS info to illustrate different possibilities that exist in the system. To create a POS info box in which a salesperson can choose between various options, follow the provided steps:
To create a POS info box in which a salesperson can choose between various options, follow the provided steps:
1. In Business Central, click the **Search:** button, enter **POS Info List**, and choose the related link.
2. Click **New**.\
The **POS Info Card** window is displayed.
3. Populate all the necessary fields in the **General** section.
* Provide **VALUESET** in **Code**.
* Provide **A list of sales agents** in **Description**.
* Enable **Set POS Sale Line Color to Red**.
* Enable **Available in Front-End**.
* Enable **Input Mandatory**.
* Select **SubCode** in **Input Type**.
4. Provide the **POS Info SubCodes** along with accompanying descriptions.
## Next steps
As soon as you've completed one of the possible POS info setup procedures, you can move on to the related configurations.
## Set up POS info on the Customer Card
Once the POS info is configured, you can navigate to the **Customer Card** to set it up.
1. In Business Central, click the **Search:** button, enter **Customers**, and choose the related link.\
The list of available customers is displayed.
2. Select the customer that you wish to assign the POS info message to.
3. When the **Customer Card** is opened, look for the **Action Tab: Related**.
4. From the **Action Tab: Related** select **Customer**.
5. Choose **POS Info** from the list of actions.\
On selecting the **POS Info Action**, you will be presented with a configuration page.
6. Open the **POS Info Code** dropdown select the **POS Info** you need.
7. Define the condition for when the POS info should be used.\
In this case, it's recommended to set it to **Always**. You can set a message depending on whether the balance is negative or positive.
## Use the Customer Card message on the POS
### Prerequisites
* Make sure the **Set up POS info on the Customer Card** procedure has been completed.
### Procedure
1. Open the POS.
2. Scan the items.
On selecting the customer, a message is displayed for the salesperson to act upon.
3. Perform the necessary actions, and press **OK**.\
The message disappears as the result.
4. Navigate to the **POS Entry List** administrative section in Business Central.\
The message is logged on the POS info POS entry on that ticket.
## Perform additional setup for POS display
### Display POS info on the **POS Menu Button**.
1. In Business Central, click the **Search:** button, enter **POS Menus**, and choose the related link.\
The list of all existing POS menus is displayed.
2. Decide where you want to place the POS menu button and configure it.
* Provide the following syntax in **Caption**: *POS Menu Button Name**``\{\{POS\_INFO.POS Info Code}}``***. For example: Sale Agents ***``\{\{POS\_INFO.VALUESET}}``***.
* Choose **Action** in the **Action Type**.
* Provide **POSINFO** in the **Action Code** and make sure that the action has the following parameters set:
* **Application Scope** with the **Option** data type, and the **Current Line** value.
* **Clear POS Info** with the **Boolean** data type, and the **false** value.
* **POS Info Code** with the **Text** data type, and the **VALUESET** value.
* Provide **BUILTIN\_SALELINE** in **Data Source Name**.
### Display the POS info in the Caption Box
1. In Business Central, click the **Search:** button, enter **POS View List**, and choose the related link.\
The list of all existing POS views is displayed.
2. Decide which view you wish to modify to display the POS info.
3. Add the following text in the **Caption Box** section of the selected POS view:
```
{
"type": "captionbox",
"base": "6%",
"fontSize": "medium",
"class": "Strong",
"binding": {
"dataSource": "BUILTIN_SALELINE",
"captionSet": {
"rows": [
{
"caption": "Sale Agent",
"field": "POS_INFO.VALUESET"
}
]
}
}
},
```
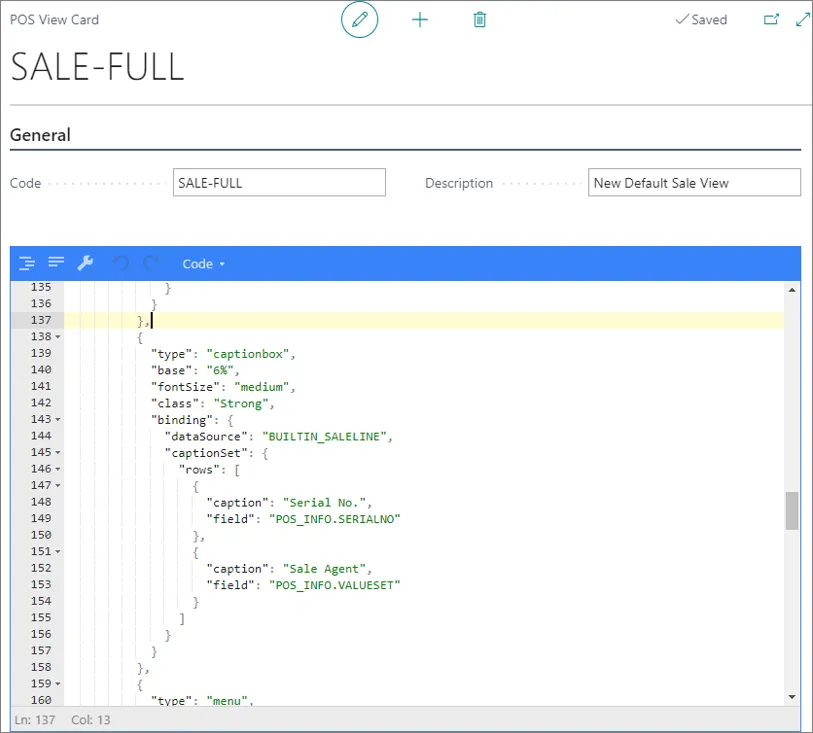
4. If the POS info has already been defined, you need to add it below or above the section, as indicated in the following screenshot.
5. (Optional) You can also display the POS info in the status bar. If you wish to do this, change the POS view and add the following text to the status bar definition section:
```
{
type: "group",
width: "5%",
sections: [
{ caption: "Sale Agent" },
{ field: "POS_INFO.VALUESET", "class": "strong" }
]
},
```
### Select the value data on the POS transaction
#### Prerequisites
* Make sure that the **Display the POS info in the Caption Box** procedure has been completed.
#### Procedure
1. Open the POS.
2. Scan the items, and press the previously created POS info button on the line.\
A pop-up window containing information from the **Subcodes** section defined in the Business Central's **POS Info Card** is displayed.
> **Note:** You will see that the color of the line has been changed to red, as assigned in the **POS Info Card**.
3. Repeat the selection for each line where needed, and complete the sale with the related payment.
> **Note:** When the cursor is moved from one line to another, the display on the **POS Menu Button** and the **Caption Box** will change accordingly, to indicate which POS info box is assigned to the line.
4. Open Business Central, and navigate to the **POS Entry List**.
5. Hover over the transaction line, and select **POS Info POS Entry** from the **Related** tab in the ribbon.\
A page containing the details of the POS info is displayed.
#### See also
* [POS Info card](/product/retail-pos-processes-pos-info-card-ref)
* [Customer setup](/product/retail-customers-create-customers)
> Documentation for NaviPartner's NP Retail, NP Attractions, NP Hospitality, NP Store Assistant and Entria products, plus their REST APIs, built on Microsoft Dynamics 365 Business Central.