> This page is for Product Documentation.
> For clean Markdown of any page, append .md to the page URL.
> For a complete documentation index, see https://docs.navipartner.com/llms.txt.
> For AI client integration (Claude Code, Cursor, etc.), connect to the MCP server at https://docs.navipartner.com/_mcp/server.
# Set up Quickpay payment integration
> Refer to this article if you wish to set up the Quickpay payment integration in NP Retail.
To set up the Quickpay online payment gateway integration in Business Central, make sure that prerequisites are met and follow the provided steps.
## Prerequisites
* Acquire a merchant account.\
To use Quickpay, you first need to register a merchant account. The merchant account can either be obtained through NaviPartner or you can create it [on your own](https://learn.quickpay.net/helpdesk/en/articles/create-new-merchant/).
* Obtain an API key.\
An API key needs to be procured before any interaction between Business Central and Quickpay can occur. The key can be obtained in the [Quickpay Manager](https://quickpay.net/helpdesk/integration-setup/).
* Ensure that the user associated with the API key has at least the same permissions as the **Api User** system user. This can be achieved by using the **Use template** functionality in Quickpay.
## Procedure
1. Search for **Payment Gateways**, and select the related link.
2. Click **New** to create a code for QuickPay.
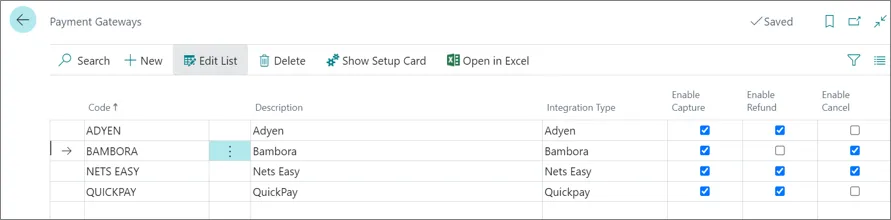
> **Note:** Depending on the required setup, the options to **Enable Capture**, **Refund** and **Cancel** need to be flagged as illustrated in the provided screenshot.
3. Click **Show Setup Card** and update the **API Password** field with the key you've previously obtained as a prerequiste.
4. Verify the connectivity with Quickpay using the **Test Connection** action.