Set up Shipmondo integration
To set up integration with Shipmondo, follow the provided steps on the Shipmondo website and Business Central in the indicated order:
Procedure on Shipmondo website
- Navigate to the Shipmondo website, and create a new account.
- Once the account is created and you’re logged in, click on your company username in the top right corner of the page.
A dropdown list is displayed with all available account options. - Click Add Funds, and provide the amount you wish to add in the pop-up window that is displayed.
- Follow the on-screen instructions to complete the payment.
- Open the Settings dropdown in the ribbon, and select Own agreements. If you have any agreements, add them here.
This section should contain the necessary agreements for the integration to be established successfully. - Open the Settings dropdown again, and select Print, followed by Printers.
- Add the printers you’re going to use as default label printers.
- Open the Settings dropdown once more, and then select API, followed by Freight and service overview.
The API product and service overview page is displayed. - Add Denmark as the Sender country, and the Receiver country.
- Select the services you wish to use inside the GLS carrier.
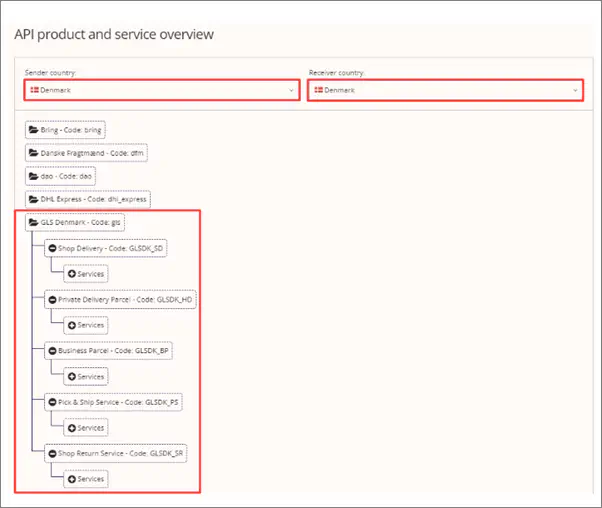
The following services are used by default in the Shipmondo integration:
- Shop Delivery - Code: GLSDK_SD
- Private Delivery Parcel - Code: GLSDK_HD
- Business Parcel - Code: GLSDK_BP
Procedure in Business Central
Click the
 button, enter Shipping Provider Setup, and choose the related link.
The page for setting up information about API in use is displayed.Click Actions in the ribbon, followed by Shipping Agents.
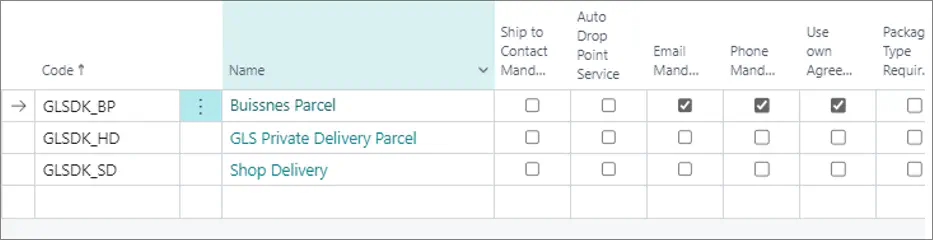
The Package Shipping Agents page is displayed.Create a new entry, and when inputting the Code, open the dropdown to Select from full list.
All fields are populated according to the service used for establishing the integration.Add the GLSDK_BP, GLSDK_HD, and GLSDK_SD shipping agent codes.

Click
 in the ribbon, and select Shipping Agent from the dropdown list, followed by Shipping Agent Services.
The Shipping Agent Services page is displayed.Add a new entry with the SERVICE value in the Code field.
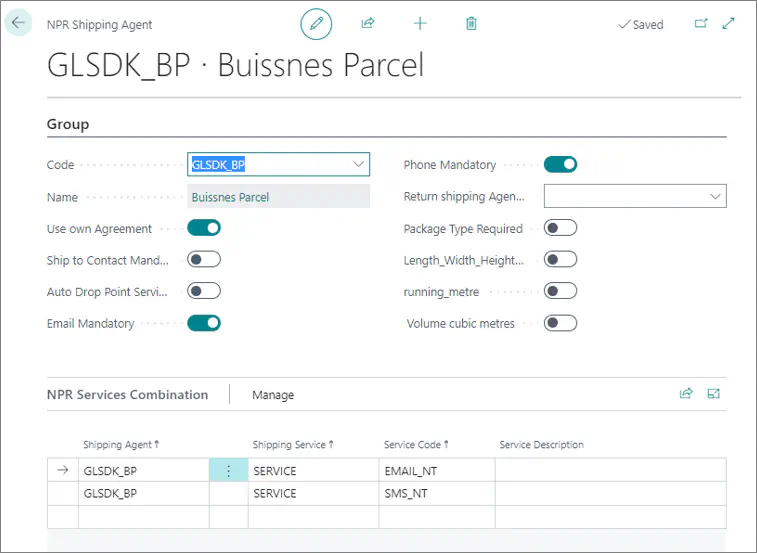
It is possible to rename the Code to something more descriptive to the users.Make sure the Email Mandatory, Phone Mandatory, and the Use own Agreement checkboxes are ticked for the Business Parcel entry in the Package Shipping Agents page.
Hover over the Business Parcel entry, and click Edit.
Add the necessary NPR Services Combination entries.
Next steps - Test connection
If you need assistance in testing the connection between Shipmondo and your Business Central environment, refer to the guide for Testing connection with Shipmondo.