Set up service module for repairs
The service module setup is complex, and can be divided into multiple stages. Follow the provided steps for more information.
- Whenever we create a customer repair card, we can set the standard for the customer repair module in the Customer Repair Setup administrative section.
| Field Name | Description |
|---|---|
| Customer Repair Management | Specifies the code of the module on top of the specific service repair scenario. |
| Rep. Cust. Default | Specifies the type of master file to be used for a customer. If you select Ordinary setup, the Customer Card will be used, and if Cash is selected, the Contact Card will be used. |
| Fixed Price of Mending | You can preset a fixed price for repairing items. |
| Fixed Price Of Denied Mending | Whenever a repair is being processed, there’s a default price that the customer can pay regardless of whether the repair is done or not (depending on the business policy in place). You can preset a fixed price for the time spent on processing the item and evaluating if it can be repaired or not. If not, the item is returned with a charge to cover the evaluation process. |
| Repair Item No. | A service item is crated to be used in the invoicing of our time/labor. An item needs to be created for the repair so that there can be an item line written in the invoice detail line when creating invoices. |
You can configure a POS menu button to retrieve the NPSM Customer Repair List. To do so, you can use the POS action RUNPAGE with the following page ID parameter - 6185133.
Email setup should be performed in the relevant administrative section.
The emails are activated based on the Status of the Customer Repair Card.
| Code | Description | Report ID | Table No. | Filter |
|---|---|---|---|---|
| REPAIR_DONE | Email repair completed | 6014502 | 6014504 | Awaits claiming |
| REPAIR_NOTE | Email Repair Customer Note | 6014504 | 6014504 | To be sent |
| REPAIR_OFFER | Email Repair Offer | 6014501 | 6014504 | Awaits approval |
| REPAIR_GUARANTEE | Email Repair Guarantee | 6014503 | 6014504 | Claimed |
- To set up the SMS module, follow the SMS setup how-to guide. The mails are activated based on the status on the Customer Repair Card.
| Code | Description | Table No. | Filters on Table | Status Filter | Sample Message |
|---|---|---|---|---|---|
| REP_APP | Cust. Repair Approved | 6014504 | Yes | Approved | We acknowledge your approval to start the repair for {150}. |
| REP_AT_VEN | Cust. Repair at Vendor | 6014504 | Yes | At Vendor | The {150} left for repair was sent to repairer for an estimate. |
| REP_AW_APP | Cust. Repair Awaits Approval | 6014504 | Yes | Awaits Approval | We have received an estimate from the repairer regarding {150}. It will cost DKK {22} Vat. Incl. Awaiting your approval to proceed with repair. |
| REP_AW_CLA | Cust. Repair Awaits Claiming | 6014504 | Yes | Awaits Claiming | The repair for the {150} is completed & ready to be collected. |
| REP_CLAIM | Cust. Repair - Claimed | 6014504 | Yes | Claimed | We trust you are satisfied with the repair done on the {150}. Please do not hesitate to contact us if you have questions regarding the repair. Thank you. |
| REP_READY | Cust. Repair Ready No Repair | 6014504 | Yes | Ready No Repair | The {150} did not need repairing. It is ready to be collected. |
| REP_RETURN | Cust. Repair Repair Return | 6014504 | Yes | Return No Repair | The {150} cannot be repaired. It is ready to be collected. |
Set up the report for customer repair with the Report Selection - Customer Report function.
Documents are produced at different stages in the repair process - Repair Done, Customer Note, Repair Offer, Repair Guarantee, Delivery Note, and Repair Label.The following options are available:
| Report Selection Option | Report ID | Code Unit ID | Print Template | Report Name | Customer Repair Card Shortcut |
|---|---|---|---|---|---|
| Repair Offer | 618513 | NPSM Repair Offer | Repair Offer | ||
| Repair Finished | 6185133 | NPSM Repair Done | Repair Done | ||
| Repair Warranty | 6185134 | NPSM Repair Guarantee | Repair Guarantee | ||
| Customer Receipt | 6185131 | NPSM Customer Note | Customer Note | ||
| Shipment Note | 6185132 | NPSM Delivery Note | Delivery Note | ||
| Repair Label | 6014547 | REPAIR | Repair Label |
Create a new Customer Card from the Customer Repair List.
- In the General section you can provide information pertaining to the customer who has requested the repair service, such as Name, Address, and contact details.
- In the Repairer Details section you can identify if the repair is being done in-house, or if it needs to be sent to an external repairer. If it is sent to an external repairer, then it’s necessary to seek a quote from the repairer before giving it to the customer.
- In the Registration section you can state information about the item that needs to be repaired, such as description, cost etc. You can state whether the item is under guarantee or if the cost repair is offered freely, as well as the expected delivery date. It is also possible to state the price (fixed or base), nd the status of the repair. The repair supervisor keeps track of which step of the repair process has been reached, and customers can be promptly notified via SMS or email about the current repair stage.
- In the Invoice To section, record the billing details of a person to whom the invoice is sent.
- In Communication, you can log the type of the repair process, and dates of communication performed with the customer.
- In Defect Description, the repairer or a salesperson records the defects to the item that they have found.
- The Repair Description section should be updated by the supervisor with all repairs that were applied and all parts used. These items are displayed on the invoice, either as remarks or chargeable spare items stated above the agreed-on price. It’s possible to state what should be charged on the invoice.
- In the Picture section, you can upload pictures of the item.
Configure the Customer Repair Card functions.
Different documents can be printed or sent by email from this section, during various stages of the repair process.- Repair Label - the label or reference can be printed to identify the item when storing it in the repair department or when sending it to an external repairer.
- Customer Note - when the customer leaves the item.
- Repair Offer - it’s printed when we obtain the price from the repairer.
- Repair Done - when the repair is completed.
- Repair Guarantee - this is printed when the item comes back repaired; it is the customer’s warrantee on the repair.
- Delivery Note - the document accompanying the item to the external repairer.
Import the picture of the item in the Customer Repair Card.
In the Tasks sections, you can perform different tasks at various stages of the repair process.
- Finalized Repair - when all spare parts, expenses, and the price have been provided, you can finalize the repair job, and make it ready for invoicing.
- Finalized Repair and Print - apart from finalizing the job, additional details can be printed for the customer as well.
- Send Status SMS - If an SMS function is configured in the system, at various statuses of the repair job, an SMS can be sent to customers. This function triggers messages which are predefined in SMS templates. It uses the telephone number defined in the Phone No field in the Customer Repair Card.
- Create Invoice - After finalization, an invoice can be created for the customer. Depending on the applied setup, this invoice can be on paper or sent via email to customers for payment and delivery purposes.
- Create Sales Order - It is the same principle as with Invoice creation, but instead of an invoice, a sales order is created.
Configure the actions in the Customer Repair Card.
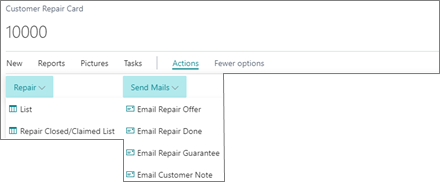
The following actions are available:
- List - a list of available customer repair cards.
- Repair Closed/Claimed List - a list for already claimed items and closed repair requests.
- Send Mails - if this function is configured in the system, at various stages of the job, emails can be sent to the customers. The function triggers email messages predefined in the Email Templates. They use the email address defined on the Customer Repair Card.