Create a simple receipt/line print template
Through this example, you will learn how to create a simple print template for a receipt.
Create a basic receipt print template
- Click the
 button, enter Print Template List, and open the related link.
 - Click New.
An empty Template Card is displayed. - Provide a unique name for the template in the Code field.
For the purposes of this example, the code is DEMO_RECEIPT. - Select Line in the Printer Type field.
The Line Settings panel is displayed below. It is used to determine which printer interface will be targeted.
Matrix and line printing are described in more detail in the Printer properties article. - Make sure Epson is selected as the Line Device.
You’ve now created the most basic receipt print template. However, it’s recommended to also define which tables will be data sources for the template.
Add and link data sources
Once all general settings are set, click Edit Data Items in the Template Card.
The Data Items page provides an overview of all available data items, their relations, and constraints.Add the NPR POS Entry table as the main data source.
When printing POS receipts in NP Retail, the data originates from the NPR POS Entry, so it is the initial data source, and any additional data sources should be referenced as subsets of it. You can achieve this behavior through indentation and Data Item Links.Add two new lines below NPR POS Entry. The first one should be the NPR POS Entry Sales Line, and the second one NPR POS Entry Payment Line.

Select the two newly created lines, and use the Indent action at the top of the page, to make them subsets of the NPR POS Entry.
Establish the data link between the NPR POS Entry and the NPR POS Entry Sales Line, and then with the NPR POS Entry Payment Line, respectively.
They need to be linked with the NPR POS Entry through the common POS Entry No., so that only the relevant entries are selected. If the data link isn’t set, the data from other POS entries will be included in the data set.
For the NPR POS Entry Sales Line, the generic TableLink will be Entry No. in the NPR POS Entry, and the POS Entry No. in the NPR POS Entry Sales Line. An example of a Fixed Filter can be placed on the field Type from the NPR POS Entry Sales Line.
Set up Template Line Designer
Once the data items are set, use the Edit Layout action in the Template Card page.
As the Printer Type is set to Line, the Type and Column No. fields are displayed instead of coordinates used for Matrix printing.
The Type is used for more advanced line construction and commands:
| Option Name | Description |
|---|---|
| Data | Predefined printer fonts or barcodes. |
| Loop | A repetitive data block. |
| Command | Predefined printer commands like Papercut, Open Cash Drawer, etc. |
| Logo | A logo selected in the Retail Logo Setup page to be printed. |
| Field Caption | A field caption for a defined field name, used instead of the value. |
| If Data Found | Conditional layout, e.g., adding a copy number if this isn’t the first print. |
The Type Option is populated with options for the Line Device, which is set to Epson.
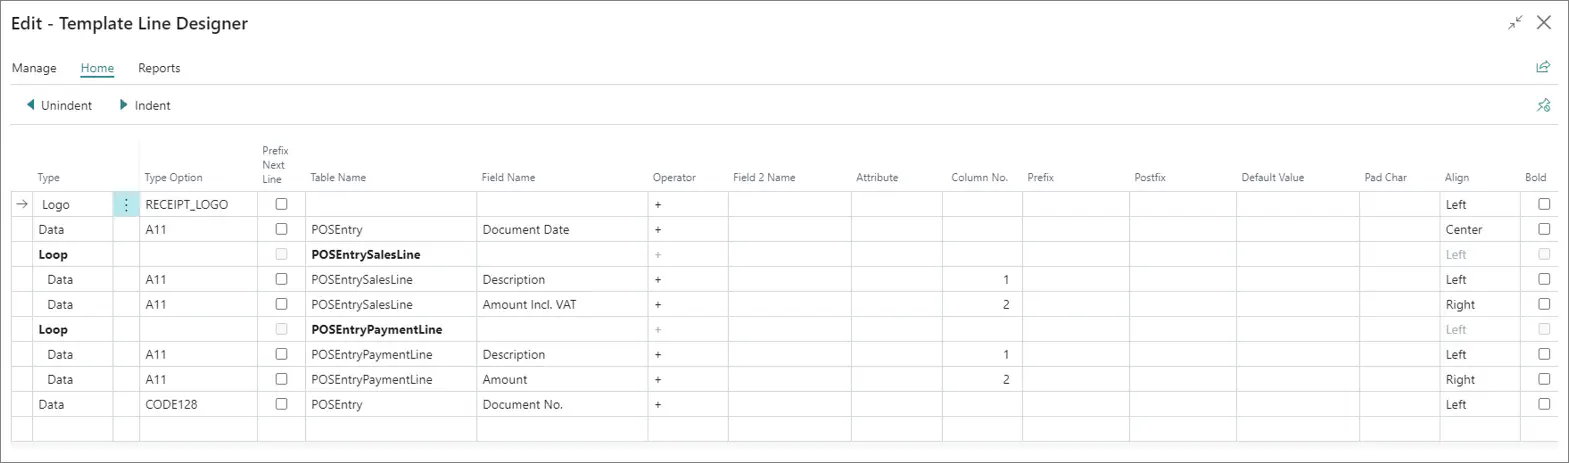
Here’s the example of the produced layout and its contents:
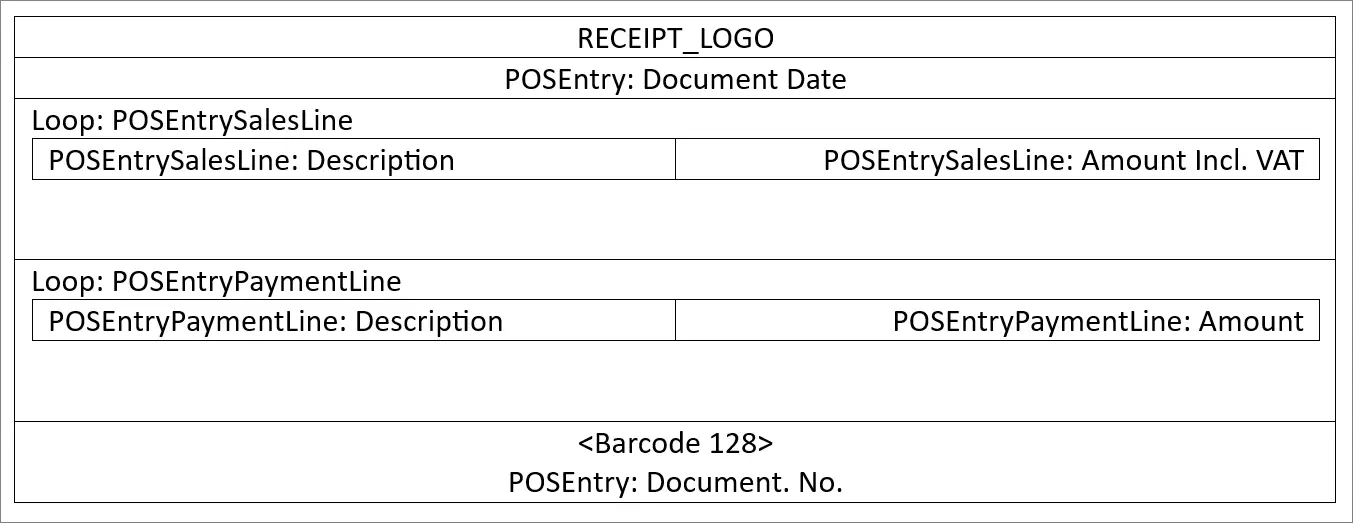
- A single logo in the top, followed by the document date
- A loop running through each POSEntrySalesLine, and outputting two columns for each record
- A loop running through each POSEntryPaymentLine, and outputting two columns for each record
- A barcode of the Document No.
After you’ve finished setting up the template, move on to device configuration described in the following section.
Configure Device Settings
Click Edit Device Settings.
As with the layout, the Printer Type and the Line Device determine the available options in this section.For Epson, the following settings are available:
- MEDIA_WIDTH - we support the two standards (58mm and 80mm)
- ENCODING - this option is available if a specific encoding is required
- DPI - the print resolution is determined with this option