Set up POS Self-Service Profile
The POS Self-Service Profile is used for configuring the behavior of self-service kiosks, which allow customers to do their own checkout.
There are specific POS actions for the self-service mode that should be set up. On the POS unit that is dedicated for self-service, the setup is configured from the POS Named Action Profile.
To set up the POS unit for self-service, you need to take the following steps:
- Click the
 button, enter POS Unit and open the related link.
 - Select the POS unit you wish to configure the self-service profile for, and open its POS Unit Card.
- In POS Type select Unattended, to signify that no salesperson will be attending to the POS Unit.
- Open the POS View Profile setup, and configure the following:
- Activate Show Prices Including VAT.
- Select Sales View in the Initial Sales View field.
- Select Login View in the After End-of-Sale View field.
- If there’s a specific theme that should be used for the customer, define and set it up in the POS Theme Code field.
- Open the POS End of Day Profile setup.
In it, you need to set up a Master & Slave end-of-day type. The self-service unit will be attached to a master POS unit, while a salesperson will perform the physical count. As we don’t use Cash on an outdoor self-service kiosk, any credit card and voucher transactions will be transferred automatically to the master POS unit when balancing is performed. - Open the POS Named Actions Profile setup and define a designated POS Name Actions Profile for self-service:
- In Login Action Code add SS-START-POS.
- In Text Enter Action Code add TEXT_ENTER.
- In Item Insert Action Code add SS-ITEM.
- In Payment Action Code add SS-PAYMENT.
- In Lock POS Action Code add SS-IDLE-TIMEOUT.
- In Idle Timeout Action Code add SS-IDLE-TIMEOUT.
- Open the POS Security Profile setup, and make sure that the Lock Timeout field is always set to NEVER, as the unattended kiosk shouldn’t be locked.
- Populate the rest of the mandatory fields.
Next steps
POS view setup
The POS view is configured according to what you require to see on the screen, but for the self-service environment, there are additional features that need to be considered:
Timeout
If a customer initiates a transaction, and then decides to leave it as-is before finalizing the process, they will be redirected to the login view after the number of seconds you define in the timeout JSON file passes. All elements in the timeout logic are configurable.
  TIMEOUT Json:
  "timeout": {
                    after: 15,
                    graceTime: 10,
                    caption: "Do you wish to continue",
                    buttonCaption: "Yes, but I need more time",
                    action: "SS-IDLE-TIMEOUT"
                       }
In the example above, the message that is displayed on the screen is hardcoded. However, if you wish to display the message in different languages, you can use I$, which is a label defined in Business Central.
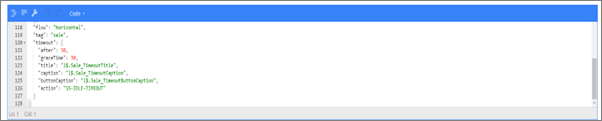
Timeout can alternatively be configured in the following way to comply with the standard translation in Business Central:
  {
  "flow": "vertical",
  "tag": "sale",
  "timeout": {
     "after": 30,
     "graceTime": 20,
     "title": "l$.Sale_TimeoutTitle",
     "caption": "l$.Sale_TimeoutCaption",
     "buttonCaption": "l$.Sale_TimeoutButtonCaption",
     "action": "SS-IDLE-TIMEOUT"
  },
Then, the I$ label follows the standard translation as per codeunit 6150702 NPR POS UI Management.
  Sale_TimeoutTitle:         Label 'We seem to have lost you...';
  Sale_TimeoutCaption:       Label 'Do you wish to continue?';
  Sale_TimeoutButtonCaption: Label 'Yes please, I need some more time.';
Login view
It’s recommended to have a simple login view which can be operated easily.
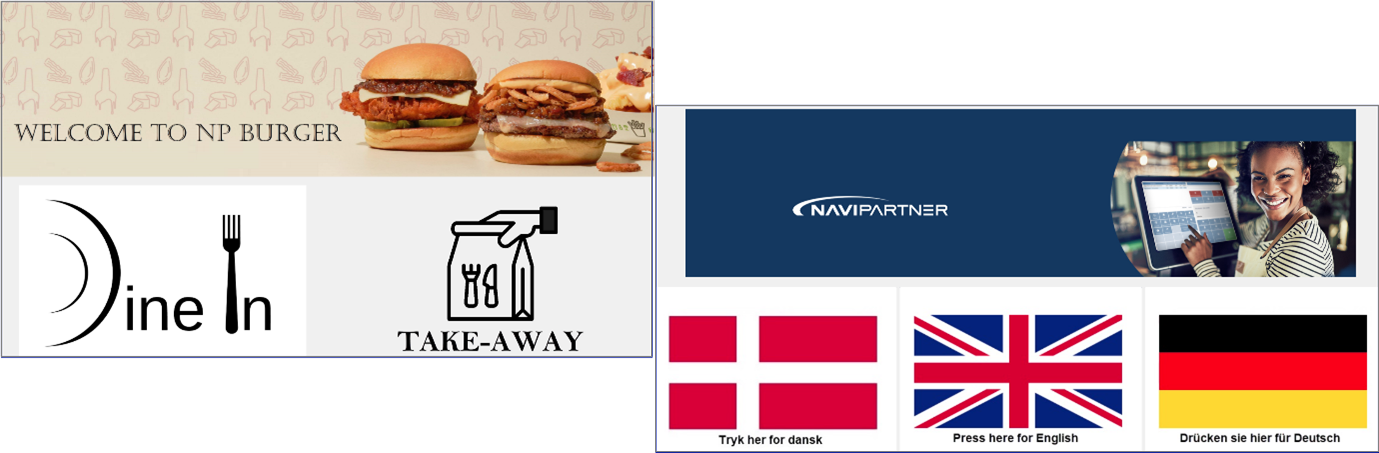
Here’s what the JSON for NP Burger looks like:
  {
  "tag": "login",
  "flow": "vertical",
  "content": [
     {
        "alignment": "left",
        "flow": "horizontal",
        "height": "38.197%",
        "margin-left": "100px",
        "margin-right": "100px",
        "content": [
        {
           "type": "image",
           "src": "https://image.navipartner.dk/wp-content/uploads/DemoImage/Burger_banner_login.jpg"
        }
        ]
     },
     {
        "flow": "horizontal",
        "height": "61.803%",
        "content": [
        {
           "type": "menu",
           "margin-left": "100px",
           "margin-right": "100px",
           "source": "SELFB-LOGIN",
           "columns": 2,
           "rows": 1
        }
        ]
     }
  ]
  }
If you are using an image, you should insert the image in the JSON file instead of adding a background image in POS menus.
The login JSON for ticketing service looks like this:
  {
  "tag": "login",
  "flow": "vertical",
  "content": [
     {
        "alignment": "left",
        "flow": "horizontal",
        "height": "40%",
        "content": [
        {
           "type": "image",
           "src": "https://www.euroshop.de/vis-content/event-euroshop2020/exh-euroshop2020.2627995/EuroShop-2020-Navi-Partner-Kobenhavn-Aps-Exhibitor-euroshop2020.2627995-bBOTtrbTR1usf2MoTcJ3pw.jpg"
        }
        ]
     },
     {
        "flow": "vertical",
        "height": "30%",
        "content": [
        {
           "type": "menu",
           "source": "SELF-LOGIN",
           "columns": 3,
           "rows": 1
        }
        ]
     }
  ]
  }
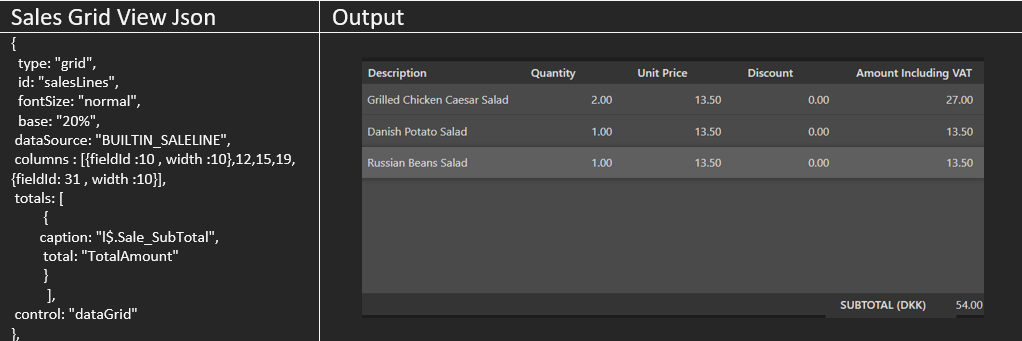
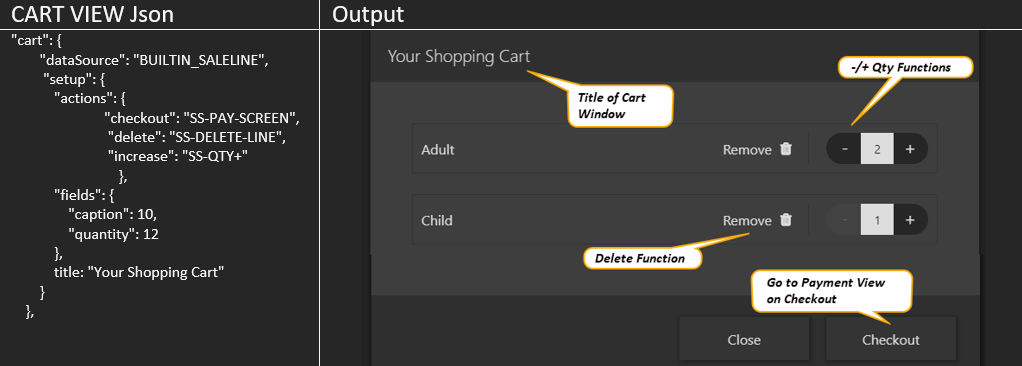
Cart view
You can set up what kind of view you’re going to have. You can choose between the classic sales grid view with the POS sales lines or a cart view.
Special buttons for self-service POS
There are several optional buttons that can be added to the self-service POS screen.
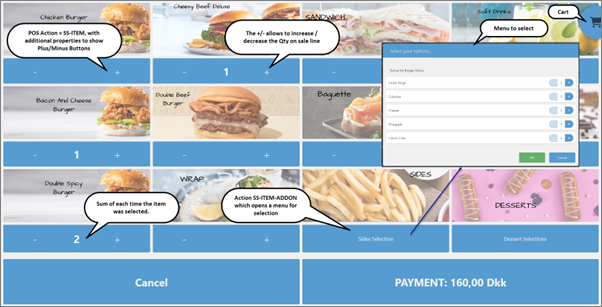
Increase/decrease quantity
The additional logic in the POS menus is that on the POS action type ITEM, you can display a + or a - sign. With these signs, a customer will be able to increase or decrease quantity on the sales line. It is set on the POS Menus line.

Display-in button

If you look at the syntax on the Caption, you can interpret it as follows:
- <big>, <Small> , <Medium>, <h1>, <h2>: Size of the letters
- Day Ticket / From Age 3/100 DKK: The actual caption (hard-coded)
- Sum (12, 6,”31001”): The sum of all quantities for the item number “31001” in the sales line. (Field 12 = Qty & 6=Number – from Table 6014406 - Sale Line POS)
SS-ITEM-ADDON in the self-service environment
If you have a menu with a list of items that customers can choose from:
When you select an item, you can increase the quantity without reselecting it. If you were to reselect an item, a line will be inserted, whereas with a menu, you can select and increase the quantity on that sales line itself.
If there’s an addon item associated with the main item:
There’s also the function with which you can associate a list of items to the main item. When you sell the main item, the menu is automatically displayed on the screen, and it’s possible to choose from the list of addon items. This is used for extras that can be ordered when buying the main item.
An example would be a fast food business in which you can buy a set menu, but you get to choose which sauce you want to accompany the menu. On selecting the menu, a popup window displays with the list of selectable items.
Each time you buy the main product, you can choose one or all item addons. Note that the configuration of item addons is to have a fixed quantity of one of the sub-products. You can’t choose more than one of each product.

Configuration of the kiosk mode in POS UI management tools
Use the kiosk-mode settings in your current POS UI management tools to configure unattended POS behavior. If your environment still uses older tooling names, follow your implementation documentation for the equivalent setup path.
SS POS theme
Follow the procedure for [creating POS themes].
The POS theme on the self-service POS might differ from that of the classic POS, so each profile needs to be attributed its own POS theme at the POS unit level.
EOD for SS POS
By default, a self-service POS is unattended, so there’s no function to perform balancing, since no salesperson will perform it on that POS. The self-service POS is attached to a master POS, in a master & slave configuration.
All sales and the payment received are performed on each individual self-service POS. At the end of the day, when the balancing process is initiated on the master POS unit, the payment amounts from the self-service POS is transferred in total to the master POS. Therefore, when the master POS is balanced, the receipt from the self-service is taken into account. At the same time, the statistics for sale of the self-service POS will be merged with that of the master POS.
For this to occur, a specific setup needs to be performed in the POS End of Day Profile of the POS Unit Card.
- In the POS End of Day Profile set the End of Day Type to Master & Slave.
Unlike the individual type, this process consolidates more than one POS for balancing purposes. - In the Master POS Unit No. add the number of the POS that is going to be used as master.
- Make sure that both the master POS, and the self-service POS have this specific End of Day Profile.
- In the POS Unit Card select Unattended for the POS Type.
Otherwise, the automatic transfer will not be done.
Hardware
This hardware is usually self-contained and free-standing, unlike the usual POS hardware placed on desks or counters. Their main function is to provide customers with self-service functionalities.
FLEXI Outdoor Kiosk
The FLEXI Outdoor Wall (Newline) is a wall-mounted interactive kiosk based on the FLEXI Outdoor unit. This unit is customizable with many of the same components as the FLEXI Outdoor, and the Access Gate editions, despite the smaller size.
Adyen payment terminal
For always-on or afterhours self-service, the Adyen UX series is ready to accept payments at any time. It’s built with the outdoors and anti-tamper measures in mind to protect information from the elements.
Boca printer
The Lemur-X is one of our smallest desktop ticket and label printers. Boca systems offer the Lemur-X as a standard with an adjustable 2’’-3.25’’ 200 dpi print width, cutter unit, and serial & USB interfaces. The LEDs provide feedback in error conditions. The printer allows you to print on ticket stock with a maximum thickness up to .010’'.