For AI agents: a documentation index is available at the root level at /llms.txt and /llms-full.txt. Append /llms.txt to any URL for a page-level index, or .md for the markdown version of any page.
        • POS processes - learn & apply
          • Configure the POS balancing feature
          • Transfer cash between POS units
          • Configure an opening mechanism for a POS unit cash drawer
          • Change a BIN from the POS sale
          • Create item addons and attach them to main items
          • Create a POS payment method
          • Create a new POS unit
          • Perform credit sales from POS
          • Apply custom configurations for item add-ons
          • Set up digital receipts
          • Generate end-of-day report
          • Group code setup
          • Insert the initial float for a POS unit
          • Set up item add-ons
          • Set up item categories
          • Add a logo to the POS screen
          • Configure master/slave POS units
          • Set up POS payment bins
          • Pay with different payment methods
          • Perform different payment operations
          • Configure period registers
          • POS info setup
          • Send email receipts from the POS sale
          • Set up POS unit groups
          • Set up price worksheet
          • Configure a receipt printout for a POS unit
          • Change responsibility center from the POS sale
          • Set up retail logo for printing
          • Conduct sales and returns on POS
          • Set up sales price
          • Set up salespeople/purchasers
          • Start the day in POS
          • Take a photo on the POS
          • Transfer cash with the POS payment BIN transfer journal
          • Set up users
LogoLogo
On this page
  • Prerequisites
  • Procedure
  • Next steps - Receive cash from the POS Payment Bin Transfer Journal
  • Prerequisites
  • Procedure
  • See also
RetailPOS processesHow to

Transfer cash with the POS Payment Bin Transfer Journal

You can transfer cash from one payment bin to another from the back office using the POS Payment Bin Transfer Journal.
Was this page helpful?
Previous

Set up users

This guide describes how to configure additional user information in the system. After creating a user and assigning permission sets, you must define their role-specific settings.

Next
Built with

A transfer journal is prepared in the back office, reflecting from which source POS payment bin the cash is taken, and to which target POS payment bin will the cash is sent. The transfer process itself is done in two steps:

  1. The journal is released from the back office.
    The POS Payment Bin Transfer Journal needs to be released so that the transferred cash becomes available on the receiving end.
  2. The journal is accepted on the POS.

To create a POS Payment Bin Transfer Journal, and gain the ability to initiate cash transfer from the back office, make sure the prerequisites are met, and follow the provided steps:

Prerequisites

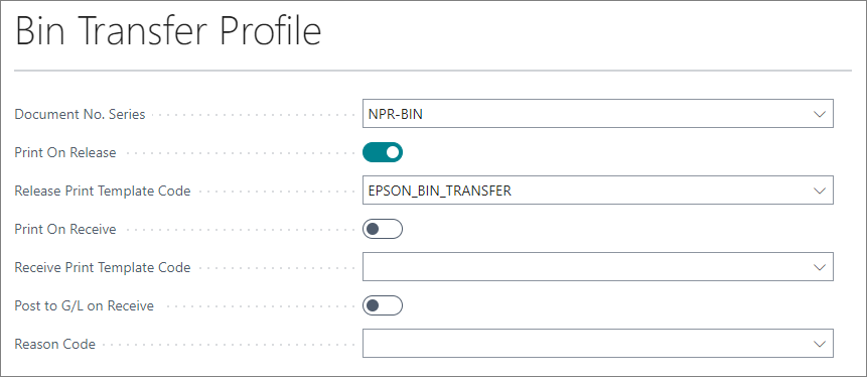
Before performing these transfers, you need to set up the rules that will govern them in the Bin Transfer Profile in Business Central.

  • Create a new Bin Transfer Profile, and enable the desired options.

  • If you wish to print transfer slips as paper trail when the supervisor takes the cash to the POS, you need to create the adequate print templates, and attach them to the actions in the Bin Transfer Profile.

    bin_transfer_profile

Procedure

  1. Search for POS Payment Bin Transfer Journal, and open the related link.
  2. Populate the details for the POS payment bin transfer journal from there:
Field NameDescription
Document No.Specifies the number of the document. It can be inserted manually or retrieved from the number series defined in the Bin Transfer Profile.
StatusSpecifies the status of the POS payment bin transfer journal.
Store CodeSpecifies which store is targeted by the transfer.
Transfer from Bin CodeSpecifies the code of the POS unit which is receiving the cash.
Received at POS Unit CodeSpecifies the code of the payment bin to which the cash is transferred .
Payment MethodSpecifies the payment method of the transferred resources.
AmountSpecifies the transferred amount.
External Document No.Specifies an optional additional reference number.
Has DenominationsSpecifies denominations used for sorting the transferred amount on the Home tab of the page.

transfer_journal

  1. Release the journal lines one by one to make them available on the POS unit transfer screen.

Next steps - Receive cash from the POS Payment Bin Transfer Journal

To accept a POS payment bin transfer journal entries on POS, make sure the prerequisites are met, and follow the provided steps:

Prerequisites

  1. Create a new POS menu button and attach the BIN_TRANSFER action to it.
    The action should be named in such a way that it’s clear the cash is received from that POS, e.g. Transfer to POS unit.

  2. Configure the POS Parameter Values, and set the Transfer Direction to Transfer In.

  3. (Optional) If you’re going to print a receipt, also configure the following parameters on the action:

    • Set the Print Transfer parameter to true.
    • Define a print template for it.
    • Configure the print template in the Report Selection - Retail administrative section in Business Central.
  4. Configure the POS Posting Setup, so that the proper accounting entries are recorded while the cash is transferred.

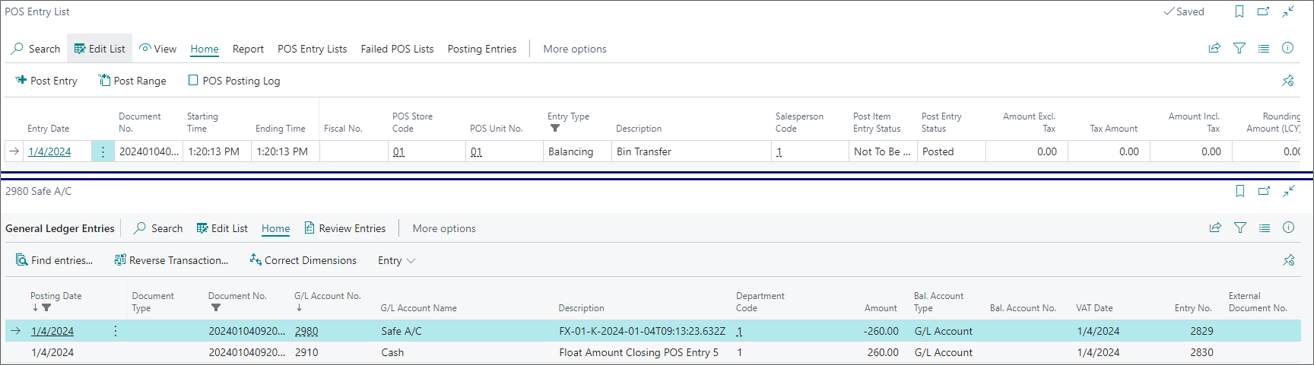
    Tip: Example: If you’re transferring cash from a safe into a POS unit attached to the POS Store 01, the generated G/L entries based on the configuration above will be Dr A/C 2910 & Cr A/C 2980 when the transaction is completed on the receiving POS unit.

Procedure

  1. Open the POS.

  2. Press the previously created button that has the BIN TRANSFER action with the Transfer In parameter attached.
    A pop-up window is displayed, and you are prompted to complete the bin transfer.

  3. Press Get Transfer Jnl. Line.
    You are presented with the transfer source and the journal lines that are available for transfer to your POS unit.

  4. Select the line you wish.
    The Move from Bin box is displayed, with additional information on the selected line.

  5. Press Finalize, and Complete bin transfer after you’ve checked the validity of presented information.
    A POS entry line is created and posted. The corresponding G/L entries are also created.

    transfer_results

See also

  • Transfer and post stock-take worksheet
  • Transfer cash between POS units