Set up fiscalization compliance - Spain
On this page
This guide explains how to configure NP Retail to comply with Spanish fiscal laws. Follow these steps:
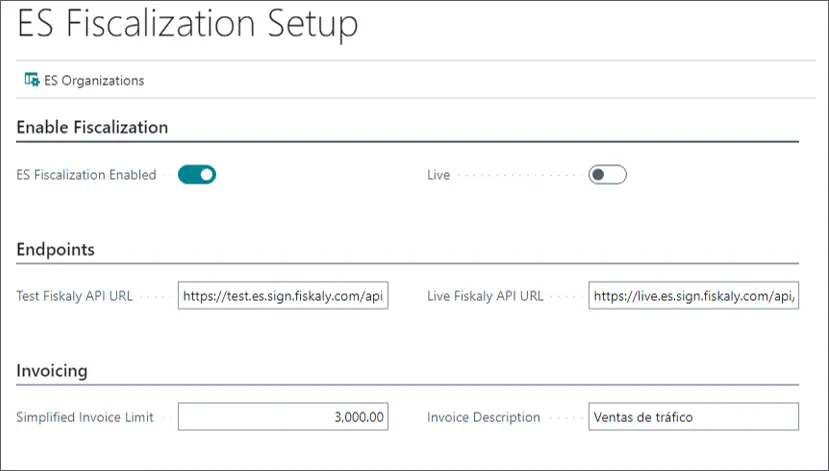
Open the ES Fiscalization Setup page, and enable ES Fiscalization.
In the Endpoints section, enter the following links:
- Test environment: https://test.es.sign.fiskaly.com/api/v1/
- Live environment: https://live.es.sign.fiskaly.com/api/v1/
If using the live environment, ensure the Live toggle switch is enabled so that transactions are sent to the correct API.
In the Invoicing tab, set the maximum amount for issuing simplified invoices in the Simplified Invoice Limit field.
If this amount is exceeded, a complete invoice is generated.Enter the invoice description in the Invoice Description field.
Go to the POS Audit Profiles page and create a new audit profile for all POS units.
Set its Audit Handler to ES_FISKALY.
Select Successful Sales in the Fill Sale Fiscal No. field.
Enable the Require Item Return Reason toggle switch.
As a result, when processing a return, a Return Reason Code will be required.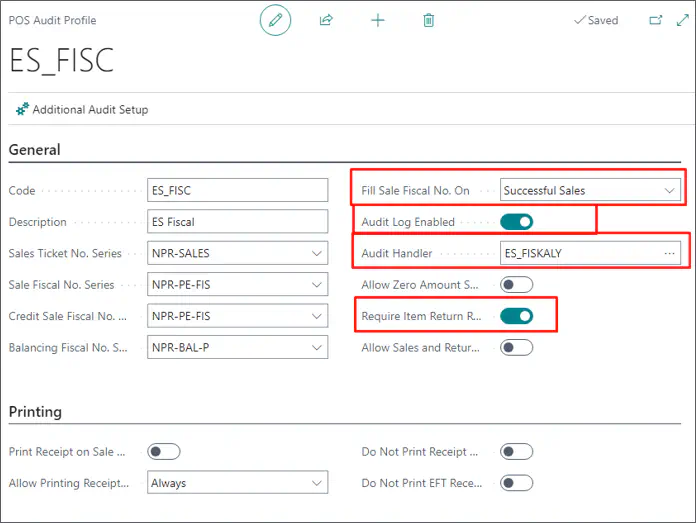
Navigate to the ES Organizations administrative section, and provide all the necessary information in the ES Organization Card.
The API Key and Secret are obtained from Fiskaly upon API creation. These credentials are displayed only once, so ensure they are copied and entered immediately.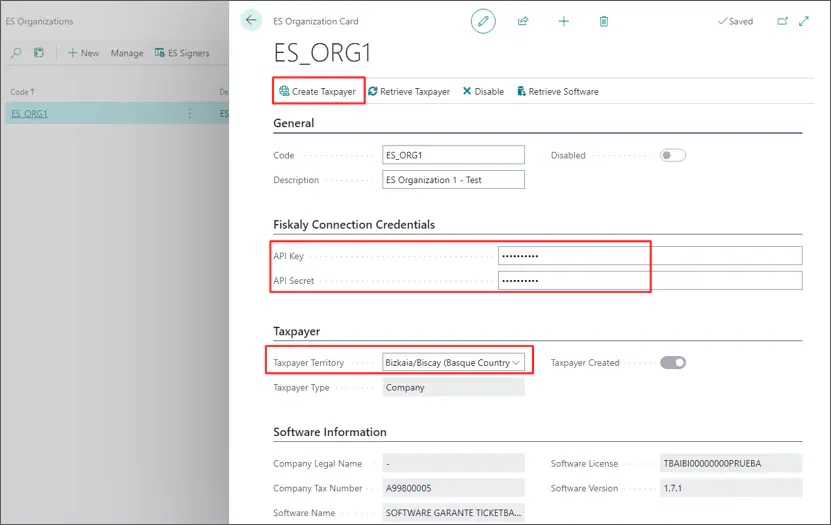
In the Taxpayer section, select the applicable business territory.
The system will configure compliance settings based on the selected territory (TicketBAI or Verifactu).Click Create Taxpayer, to register the organization in Business Central.
The Fiskaly dashboard is updated accordingly.Company details (Company Name, Tax Number) and software-related information (Software Name, License, Version) are automatically populated.
(Optional) If the server is unavailable during taxpayer creation, use:
- Retrieve Taxpayer to refresh the taxpayer details.
- Retrieve Software to refresh the software details.
(Optional) To deactivate an organization, use the Disable action.
Once disabled, the same organization can’t be reactivated.
Each organization represents a single POS store.Before creating an organization in Business Central, you must first create a managed organization on the Fiskaly dashboard. Each POS store requires a separate ES Organization.After the organization is created, navigate to the ES Signers table, enter the required information, and select the previously created organization from the ES Organization Code field.
Click Create in the ribbon to activate the signer.
The certificate-related details are automatically populated, and the signer state is updated to Enabled.
The Disable action is used to put the signer out of work, and when executed, the signer’s State is updated to Disabled.
If the signer’s State is Defective, it may be due to an expired certificate or updated taxpayer details.
If the server is unavailable during signer creation, use the Retrieve action to update certificate details from Fiskaly.
Only one signer is needed per organization.From the ES Clients table, select the POS units, and link them to the previously created organization in the ES Organization Code field.
Click Create in the ribbon to connect the POS unit with the organization.
The signer is assigned to the related POS unit in the ES Signer Code field.
The client’s State is updated, and the Signer ID is populated automatically.
Each organization (store) has a single signer, used by all associated POS units.
You can use the Disable action if you need to deactivate a POS unit. The Client State will be updated to Disabled as a result.
If the server is unavailable during client creation, you can use the Retrieve action to refresh the Signer ID from Fiskaly.
In the ES Clients table, define the No. Series for:
- Simplified Invoices – Invoice No. Series
- Complete Invoices – Complete Invoice No. Series
- Corrective Invoice – Correction Invoice No. Series
Although there isn’t a strict law regulation on invoice numbering, there are certain known recommendations:
- Use uppercase letters (A-Z) and digits (0-9). Avoid lowercase letters.
- Blank space: if you use a blank space, only one character will be used, and never any more.
- Usage of special characters: Dash ‘-’, underscore ‘_’, forward slash ‘/’ and full stop ‘.’
- If using a series prefix, it should precede the invoice number with a space separator.
- The invoice number must not start with blanks (therefore text adjusted to the left).
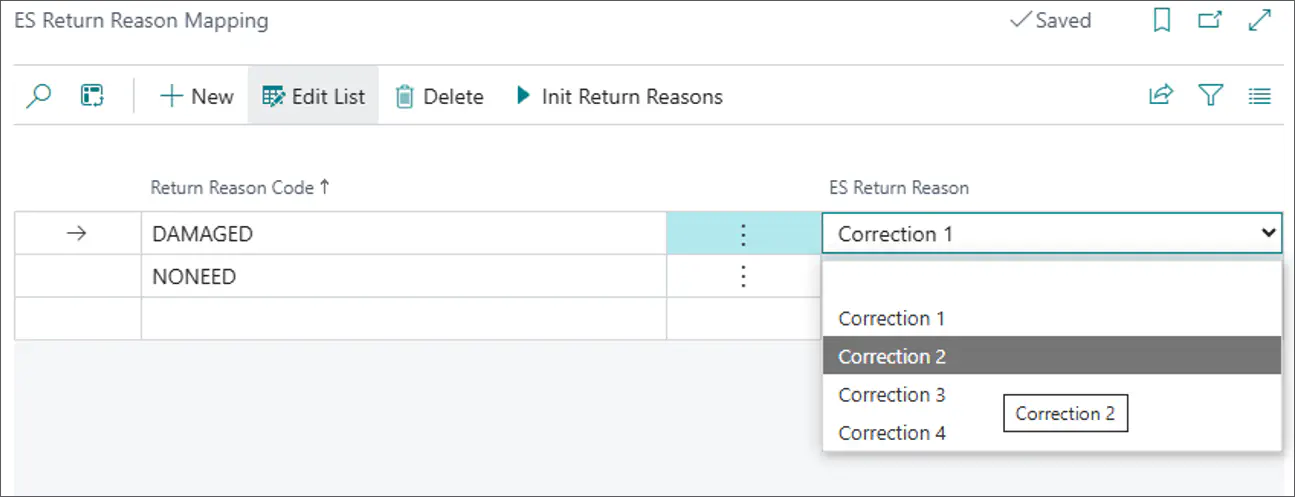
Define the possible return reasons in the Return Reason table.
Navigate to the Return Reason Mapping table, and assign fiscalization correction options from the drop-down list.
All POS transactions are recorded in the ES POS Audit Log Aux. Info table.

ES POS Audit Log Aux. Info reference
The following fields and options are found in the ES POS Audit Log Aux. Info table:
| Field Name | Description |
|---|---|
| ES Organization Code | Identifies the organization that processed the transaction. |
| ES Signer Code | Specifies the signer used for fiscalization. |
| Invoice Type | Specifies whether the issued invoice is Simplified, Complete, Correcting, Enrichment, Remedy or External. |
| Invoice No. | Specifies the invoice number given from the number series previously set on the ES Clients Setup page. |
| Invoice State | Specifies whether the invoice was Issued, Cancelled or Imported. |
| Invoice Registration/Cancelation State | Reflects the invoice status on Fiskaly: Pending, Registered, Requires Correction, Requires Inspection, Stored or Invalid. |
The following actions are available in the ES POS Audit Log Aux. Info ribbon:
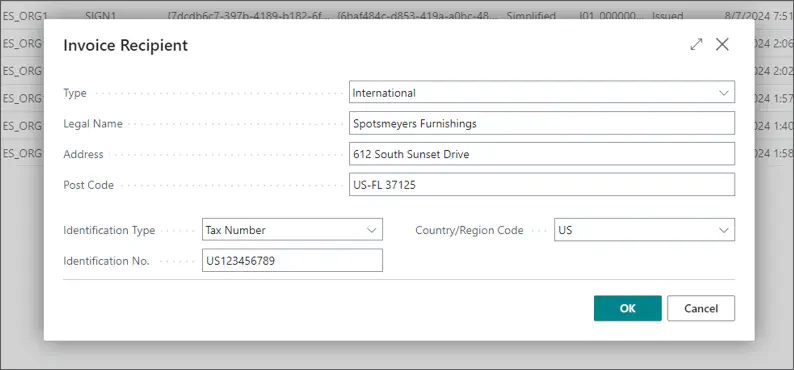
Create - If the invoice creation at the end of sale fails, you can use this action to create it after first selecting the failed transaction in the table.

When the action is executed, a window with the invoice recipient information is opened, and you can provide all the necessary information regarding the customer to create a Complete Invoice.
Retrieve - This action updates the data in the table according to the invoice status on the Fiskaly end. This action only updates the data for the selected transaction.